Greenwood County Time & Attendance
Please sign in
Close
Time Entry Help
- Website address: www.greenwoodsc.gov/TimeAttend
- Sign in
- Username - First initial & last name
- Password - Last 4 of social security #
- Select an employee from either the:
- Employee dropdown menu or
- "Pay Period" tab (Easiest)
- Note - "Dept" menu can be used to filter by department
- Use the "Auto-Fill" menu to pre-fill the time sheet from available templates
- Choose a template that best matches the hours worked for an employee
- Vacation or Sick time can be loaded for an entire week
- Note - Always use "Auto-Fill" before manually entering hours
- Time sheet editing modes:
- "Add" - Add time entry records
- "Edit" - Edit existing time entries. Note - You must click the "Save" button on the left panel to save your edits
- "Delete" - Delete time entries by clicking on the calendar
- To manually enter hours, select either a "Working" or "Absent" pay code
- "Reg"ular - Choose the correct pay code
- Overtime - Choose the correct pay code
- Comp Earned - Only allowed after 40 hours of regular time
- Note - Holiday pay is listed under the "Working" dropdown
- Vacation - Choose the correct pay code
- Sick - Choose the correct pay code
- Comp Used - Sets the pay code to use comp time
- Note - Holiday pay is listed under the "Working" dropdown
- Methods for entering hours on the "Week 1" or "Week 2" tabs
- Double-click on the "Hours" textbox, enter hours, then click on calendar
- Drag your mouse on the time sheet calendar
- Click a quick hours button and then click on the calendar
- Enter the "From" and "To" time and then click on the calendar
- Note - Comments for time entries can be added on the the left panel
- "Pay Period" tab
- Use the pay period tab to verify that all time entries are correct
- Employees use the "Approve" button to acknowledge an accurate time sheet
- Supervisors use the "Approve my staff" button the approve subordinates time sheets
- To make updates after supervisor approval, click "Allow staff updates"
- Exporting time entries to a text file (Department keyers only)
- Make sure all employees times have been approved from the "Pay Period" tab
- Press the "Export" button
- Save the time entries csv file to a location on your computer
- Importing the time entry csv text file into the Munis payroll software
- Go to "Time Entry" in Munis and click yes to continue
- Click the "Import" button
- Browse for the csv that you exported to your computer
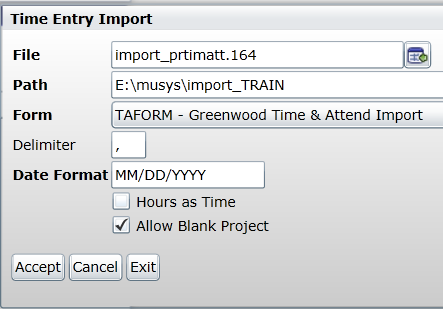
- Make sure the "Form" prompt is set to "Greenwood Time & Attend Import"
- Do not change any other menu options on this form. See below:

- Click "Accept" and then the "Green check Accept"
- Click "Release" to send your time entries to your Munis approver
- You may also choose "Resume" to review your time in Munis
- Printing time sheets
- Note - Printing time sheets is optional
- If a "Week 1 or 2" tab is highlighted, a single time sheet will be printed
- If the "Pay Period" tab is hightlighted, all time sheets will be printed
- Notes
- Available accrual balances are listed at the bottom of the screen
- You are only required to press the "Save" button if you are closing your web browser session on the last employee